In the previous post, the Necronomicon got a new cover. But the new cover is too boring. It's just a plain faux leather cover, it needs something extra! The Simon Necronomicon has this glyph on the cover that looks like a pentagram with some extra lines in it; I believe Vin Diesel had a tattoo of it in "Babylon AD". Since I'm too lazy to come up with something more original, I'm gonna put this glyph back on the cover. But I'm not too lazy to put some effort in it, so here we go!
More materials
In addition to the stuff mentioned in the first part, here's what you need for this tutorial:
- Oil-based modeling clay. Unlike water based clay, this stuff doesn't harden. It's used for creating master shapes for molding and 3D scanning.
- Sculpting tools
- RTV (room temperature vulcanizing) silicone rubber
- Acrylic resin. I had some left from my Dwarven hammer project. I wanted to use epoxy resin at first, but since I still had this stuff lying around I used this.
- Gold paint
- Glue
Creating the glyph
I startted out by drawing the glyph on a piece of cardboard. I made it a bit bigger than the one on the original cover, mine is 8 cm wide. The reason I used cardboard instead of paper will become clear later on. I rolled some modeling clay into a thin sheet (about 2 mm thick) and cut narrow strips from it. Next, I started assembling the glyph using these strips on the cardboard. It took a lot of patience, perhaps I should have chosen something simpler for my first project. Ah, well, it worked out fine!


The clay model will now be used to create a silicone mold. I made a wall around the shape using more modeling clay, and then put the entire thing, with the cardboard, in the refrigerator. Why? As I mentioned before, oil-based clay doesn't harden like water-based clay. I don't want to damage it by accident, and cooling it hardens the clay.
Creating the mold
The model is now ready for making a silicone mold. RTV silicone rubber is a two-component material. It's not cheap, so you don't want to prepare more than you need. One huge advantage, though, is that you can recycle old molds. You can cut them into pieces and incorporate them in new molds; fresh rubber will stick to it without any problems.

If you want to make a perfect mold, you need a vacuum pump to remove any air bubbles from the liquid compound. I don't have this, because it's an expensive piece of equipment and I don't want to spend that kind of money when just starting out. Luckily, there's another technique to eliminate bubbles! The trick is to pour it from quite high, and pour slowly. The stream of liquid rubber is then stretched out so bubbles can escape it.
I poured about a centimeter of rubber on the model, wich should make for a durable mold. The rubber takes about 24 hours to cure fully. After that, the clay can be removed from the mold.


Casting the glyph
After the rubber had cured long enough, I removed the clay from the mold. It had worked perfectly, and now I had a rubber mold with a perfect impression of the glyph. I wanted to use epoxy resin for casting at first, but since I still had enough acrylic resin left from one of my previous projects, I decided to use that. I mixed up a batch and poured it in the mold. The next day, I removed it from the mold and cleaned it up a bit. Unfortunately, some pieces broke off and I had to use some super glue to put them back on. Acrylic resin is a bit too brittle for this.

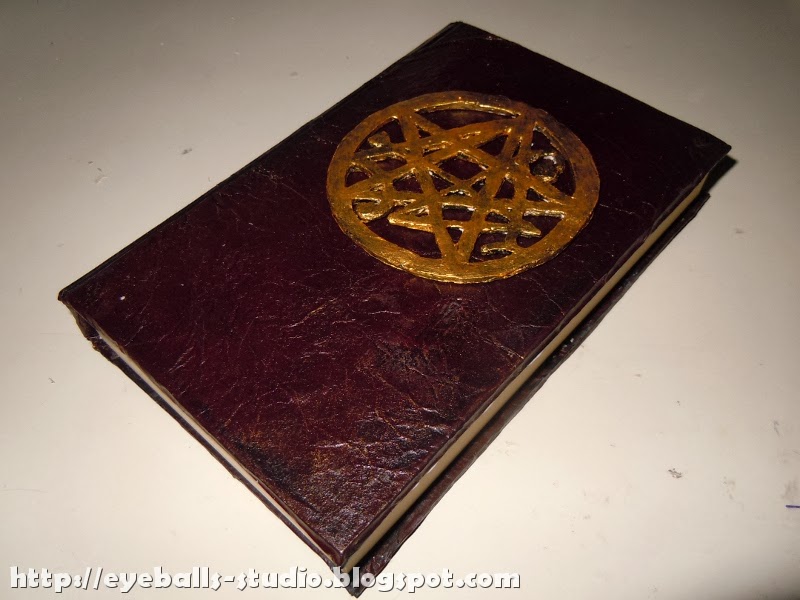
After cleaning it up, I painted the glyph. I started with a black base coat, followed by gold. I made sure some of the black was still showing a bit through, so it looked like there was some dirt and wear on it. Finally, I glued it on the cover with epoxy glue.


Finished... for now
Here's a pic of the finished book. Unfortunately, I didn't do a really good job with the cover. It looks fine, but the book is too hard to open. The hinge is made all wrong. Well, I suppose it's part of the learning process. I already figured out what's wrong, and I will try to do it right the next time.

I startted out by drawing the glyph on a piece of cardboard. I made it a bit bigger than the one on the original cover, mine is 8 cm wide. The reason I used cardboard instead of paper will become clear later on. I rolled some modeling clay into a thin sheet (about 2 mm thick) and cut narrow strips from it. Next, I started assembling the glyph using these strips on the cardboard. It took a lot of patience, perhaps I should have chosen something simpler for my first project. Ah, well, it worked out fine!


The clay model will now be used to create a silicone mold. I made a wall around the shape using more modeling clay, and then put the entire thing, with the cardboard, in the refrigerator. Why? As I mentioned before, oil-based clay doesn't harden like water-based clay. I don't want to damage it by accident, and cooling it hardens the clay.
Creating the mold
The model is now ready for making a silicone mold. RTV silicone rubber is a two-component material. It's not cheap, so you don't want to prepare more than you need. One huge advantage, though, is that you can recycle old molds. You can cut them into pieces and incorporate them in new molds; fresh rubber will stick to it without any problems.

If you want to make a perfect mold, you need a vacuum pump to remove any air bubbles from the liquid compound. I don't have this, because it's an expensive piece of equipment and I don't want to spend that kind of money when just starting out. Luckily, there's another technique to eliminate bubbles! The trick is to pour it from quite high, and pour slowly. The stream of liquid rubber is then stretched out so bubbles can escape it.
I poured about a centimeter of rubber on the model, wich should make for a durable mold. The rubber takes about 24 hours to cure fully. After that, the clay can be removed from the mold.


Casting the glyph
After the rubber had cured long enough, I removed the clay from the mold. It had worked perfectly, and now I had a rubber mold with a perfect impression of the glyph. I wanted to use epoxy resin for casting at first, but since I still had enough acrylic resin left from one of my previous projects, I decided to use that. I mixed up a batch and poured it in the mold. The next day, I removed it from the mold and cleaned it up a bit. Unfortunately, some pieces broke off and I had to use some super glue to put them back on. Acrylic resin is a bit too brittle for this.

After cleaning it up, I painted the glyph. I started with a black base coat, followed by gold. I made sure some of the black was still showing a bit through, so it looked like there was some dirt and wear on it. Finally, I glued it on the cover with epoxy glue.


Finished... for now


0 reacties:
Een reactie posten