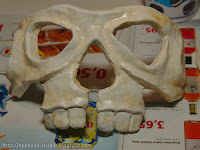
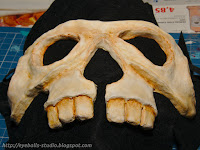
A while ago, I made a cast of my face with the help of my wife and a friend. And here's the project I needed this cast for: my skull mask! It's inspired by Will Morgan's Necromancer mask, and will be part of my costume for this year's Elf Fantasy Fair.
Materials
I first covered the face cast with a thin layer of oil based clay. I didn't want the mask to fit too tight, especially because I wanted to cover the inside with some fabric to make it a bit more comfortable to wear. Especially around the eyes I needed enough space for my eyelids. I did mark the exact location of the eyes, to make sure I can see through them properly.
I used Fimo Air ultra light to sculpt the mask. In Will Morgan's tutorial, he first sculpts the mask in clay, then he makes a silicone mold and casts it in urethane resin. This was a bit too advanced for my skill level, so I just use the mask I sculpted. Because the clay is very light, I can easily wear the mask for an entire day without getting cramps in my neck.
There aren't much pictures of the sculpting process, because my hands were full of clay and I didn't want to get clay all over the camera. Not really much to say about it. I'm not exceptionally skilled at sculpting, but it turned out quite ok.
The clay took quite a while to dry. It was still on the face cast, so it could only dry at the front. After five days, it had dried enough to take it off the cast so it could fully dry, and after a week it was done.
Painting
Unfortunately, there were a few cracks in the clay. To fix this, I brushed a few layers of wood glue over the mask. This filled in all the cracks and made it a lot stronger. To prepare it for painting, I first painted it with a mixture of wood glue and acrylic gesso, followed by a coat of pure gesso.
I used two colors for painting. I started with several washes of yellow ochre for the base color. First a very light wash all over the mask, followed by a bit darker around the eyes, teeth and in the deeper ridges. Next, a bit of burnt umber to make the eyes and teeth pop out a bit more.
To finish it, I sprayed two coats of matte varnish over the mask.
Finishing
Before glueing fabric on the inside of the mask, I first attached two loops made of elastic band to the sides, so I can loop another piece of elastic band through it to keep the mask of my face. These are glued in place using super glue.
After that, I glued two layers of fabric on the inside. First, a piece of felt. I didn't cut it to size first, I glued the entire piece on and then cut off any excess. Next, a piece of scrap fabric from an old black T-shirt. I did this because the felt gave off a lot of loose fibres, and the T-shirt fabric by itself would still feel quite hard. By combining the two, it's a lot softer but without all the loose fibres.
I have tried the mask on and it fits perfectly. To put it on, I simply loop a piece of elastic band through the two loops, around my head. To conceal the rest of my face, I will wear a black morph mask underneath it.
Materials
- Face cast (see this Youtube video for a making-of)
- Fimo Air ultra light clay
- Oil based clay
- Sculpting tools
- Wood glue
- Super glue
- Acrylic gesso
- Acrylic paints
- Matte varnish
- Fabric scraps
- Elastic bands (the type you use in clothing, not rubber bands)
I first covered the face cast with a thin layer of oil based clay. I didn't want the mask to fit too tight, especially because I wanted to cover the inside with some fabric to make it a bit more comfortable to wear. Especially around the eyes I needed enough space for my eyelids. I did mark the exact location of the eyes, to make sure I can see through them properly.
I used Fimo Air ultra light to sculpt the mask. In Will Morgan's tutorial, he first sculpts the mask in clay, then he makes a silicone mold and casts it in urethane resin. This was a bit too advanced for my skill level, so I just use the mask I sculpted. Because the clay is very light, I can easily wear the mask for an entire day without getting cramps in my neck.
There aren't much pictures of the sculpting process, because my hands were full of clay and I didn't want to get clay all over the camera. Not really much to say about it. I'm not exceptionally skilled at sculpting, but it turned out quite ok.
The clay took quite a while to dry. It was still on the face cast, so it could only dry at the front. After five days, it had dried enough to take it off the cast so it could fully dry, and after a week it was done.
Painting
Unfortunately, there were a few cracks in the clay. To fix this, I brushed a few layers of wood glue over the mask. This filled in all the cracks and made it a lot stronger. To prepare it for painting, I first painted it with a mixture of wood glue and acrylic gesso, followed by a coat of pure gesso.
I used two colors for painting. I started with several washes of yellow ochre for the base color. First a very light wash all over the mask, followed by a bit darker around the eyes, teeth and in the deeper ridges. Next, a bit of burnt umber to make the eyes and teeth pop out a bit more.
To finish it, I sprayed two coats of matte varnish over the mask.
Finishing
Before glueing fabric on the inside of the mask, I first attached two loops made of elastic band to the sides, so I can loop another piece of elastic band through it to keep the mask of my face. These are glued in place using super glue.
After that, I glued two layers of fabric on the inside. First, a piece of felt. I didn't cut it to size first, I glued the entire piece on and then cut off any excess. Next, a piece of scrap fabric from an old black T-shirt. I did this because the felt gave off a lot of loose fibres, and the T-shirt fabric by itself would still feel quite hard. By combining the two, it's a lot softer but without all the loose fibres.
I have tried the mask on and it fits perfectly. To put it on, I simply loop a piece of elastic band through the two loops, around my head. To conceal the rest of my face, I will wear a black morph mask underneath it.


