Allright, here's the second part of my new set of tombstones! In the first part, I talked about the construction and the new materials and techniques I used, in this part I'll talk about painting.


Materials
On my first stones, I used a mixture called Monster Mud, a mixture consisting of joint filler and paint, to coat the foam. Being the complete noob I was back then, I had no idea what type of joint filler was meant, and at first I tried mixing dry powdered joint compound with latex paint. Of course, this didn't work, and I found out you needed liquid filler. So I prepared small batches of powdered joint compound and water, and mixed my paint with that. This didn't have a long working time, about 30 minutes, and didn't have a good consistency, it contained lots of lumps. I then found out the stuff you need for this is actual liquid joint compound, not powder you have to mix with water like plaster.
Of course, I only found out what I was doing wrong until after Halloween, and I couldn't find the liquid stuff I needed. Luckily, in the meantime I have not only found a store that has it, but also a better recipe for foam coatings! The problem with the Monster Mud was that it was quite brittle. Perhaps this was because I used the wrong kind of joint filler, but my props were easily damaged. Another mixture that's supposed to be a bit more flexible and durable is Van's Super Scenic Dope, also known as VSSD or simply Scenic Dope. It has acrylic caulk mixed into it to make it more flexible, and much less joint compound.
The recipe calls for a quart of paint, four tubes of caulk and two cups of joint compound. So, in metric units, that's (approximately) one liter of paint, four tubes of caulk and half a liter of joint compound. For the paint, I mixed some leftovers white and black paint to get a gray base color.
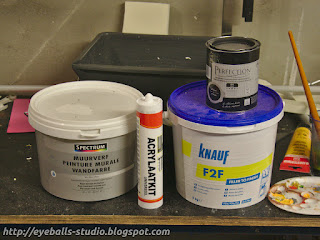


To give it some additional stone texture, I also mixed in some fine white sand. I didn't really measure the amount, I just eyeballed it until the consistency and texture seemed right. Keep in mind that the amounts of ingredients can be varied a bit to make the coating harder, more flexible, etcetera. Oh, and I used the cheapest paint and caulk I could find. No need to use the fancy, expensive stuff here.
Base coating
Before I started applying the foam coating, the engraved text was painted. This was done with plain dark gray paint, because the scenic dope would fill up the letters and ruin the details.
After the text had dried, I started putting on the scenic dope. I invited some friends to help me paint; after all, we had twelve stones to paint (thanks again, guys, you all rock!). Of course, some of the dope ended up in the letters anyway, and we had to use a small brush to clean them out again.


The mixture was very thick; if you'd paint with it like you'd do with normal paint, you'd end up with very visible brush strokes. To avoid this and get a nice, even stone texture, I used a dabbing motion with my brush. Another advantage of thick paint is that it also serves as a joint filler to fill up seams!


I had to do two coats of paint on each side to get good coverage. It took a while for all of it to dry, but the effect turned out great! Mixing sand with the paint gives it an excellent rough stone texture.


 One word of advice, though: don't use expensive brushes with this mixture! Use the cheapest one you can find, because you'll probably have to throw them away afterwards anyway.
Shading
After the basecoat had dried, all stones had an even, gray color. To break this up a bit, I took some gray, purple and black paint, mixed them to get a blueish gray and applied them with a sponge and lots of water. The rough texture of the surface quickly wore down the sponge, wich actually made it easier to work with! In the meantime, I also painted the text and all the cracks a dark gray.


The final shading step was applying a white drybrushing. This technique is especially useful for rough surfaces, like the one I have here. The grains of sand pick up the white paint nicely, and you end up with a very convincing stone texture.


Finishing
I had planned to do some more finishing touches, such as adding fake moss. I wanted to use sawdust and green paint for that, but unfortunately, time was against me. Since I didn't know how weatherproof the scenic dope was, I clearcoated all the stones with a matte varnish, wich almost gave me a heart attack...
You see, I had used a ballpoint pen for marking the foam. It had bled through the first layer of paint a bit, but the second layer had covered it up nicely. However, the varnish had somehow dissolved the ink and made it bleed through all the layers of paint! On most stones it wasn't very visible, because I had used the pen mostly to mark cutting lines, but for example the Jack Sparrow stone had a few very visible lines on it.
What was my reaction when I saw this? Well, if you have ever seen that Mr. Bean movie, where he ruins a painting, that's more or less how I reacted! Luckily, they weren't ruined, a little bit of gray paint, followed by a final layer of white drybrushing fixed it.


Materials
- Liquid joint compound
- House paint
- Acrylic caulk (NOT silicone!)
- Fine sand
- Drill with mixing attachment
- Brushes and sponges
- Acrylic paints
On my first stones, I used a mixture called Monster Mud, a mixture consisting of joint filler and paint, to coat the foam. Being the complete noob I was back then, I had no idea what type of joint filler was meant, and at first I tried mixing dry powdered joint compound with latex paint. Of course, this didn't work, and I found out you needed liquid filler. So I prepared small batches of powdered joint compound and water, and mixed my paint with that. This didn't have a long working time, about 30 minutes, and didn't have a good consistency, it contained lots of lumps. I then found out the stuff you need for this is actual liquid joint compound, not powder you have to mix with water like plaster.
Of course, I only found out what I was doing wrong until after Halloween, and I couldn't find the liquid stuff I needed. Luckily, in the meantime I have not only found a store that has it, but also a better recipe for foam coatings! The problem with the Monster Mud was that it was quite brittle. Perhaps this was because I used the wrong kind of joint filler, but my props were easily damaged. Another mixture that's supposed to be a bit more flexible and durable is Van's Super Scenic Dope, also known as VSSD or simply Scenic Dope. It has acrylic caulk mixed into it to make it more flexible, and much less joint compound.
The recipe calls for a quart of paint, four tubes of caulk and two cups of joint compound. So, in metric units, that's (approximately) one liter of paint, four tubes of caulk and half a liter of joint compound. For the paint, I mixed some leftovers white and black paint to get a gray base color.


To give it some additional stone texture, I also mixed in some fine white sand. I didn't really measure the amount, I just eyeballed it until the consistency and texture seemed right. Keep in mind that the amounts of ingredients can be varied a bit to make the coating harder, more flexible, etcetera. Oh, and I used the cheapest paint and caulk I could find. No need to use the fancy, expensive stuff here.
Base coating
Before I started applying the foam coating, the engraved text was painted. This was done with plain dark gray paint, because the scenic dope would fill up the letters and ruin the details.
After the text had dried, I started putting on the scenic dope. I invited some friends to help me paint; after all, we had twelve stones to paint (thanks again, guys, you all rock!). Of course, some of the dope ended up in the letters anyway, and we had to use a small brush to clean them out again.


The mixture was very thick; if you'd paint with it like you'd do with normal paint, you'd end up with very visible brush strokes. To avoid this and get a nice, even stone texture, I used a dabbing motion with my brush. Another advantage of thick paint is that it also serves as a joint filler to fill up seams!


I had to do two coats of paint on each side to get good coverage. It took a while for all of it to dry, but the effect turned out great! Mixing sand with the paint gives it an excellent rough stone texture.


Shading
After the basecoat had dried, all stones had an even, gray color. To break this up a bit, I took some gray, purple and black paint, mixed them to get a blueish gray and applied them with a sponge and lots of water. The rough texture of the surface quickly wore down the sponge, wich actually made it easier to work with! In the meantime, I also painted the text and all the cracks a dark gray.


The final shading step was applying a white drybrushing. This technique is especially useful for rough surfaces, like the one I have here. The grains of sand pick up the white paint nicely, and you end up with a very convincing stone texture.


Finishing
I had planned to do some more finishing touches, such as adding fake moss. I wanted to use sawdust and green paint for that, but unfortunately, time was against me. Since I didn't know how weatherproof the scenic dope was, I clearcoated all the stones with a matte varnish, wich almost gave me a heart attack...
You see, I had used a ballpoint pen for marking the foam. It had bled through the first layer of paint a bit, but the second layer had covered it up nicely. However, the varnish had somehow dissolved the ink and made it bleed through all the layers of paint! On most stones it wasn't very visible, because I had used the pen mostly to mark cutting lines, but for example the Jack Sparrow stone had a few very visible lines on it.
What was my reaction when I saw this? Well, if you have ever seen that Mr. Bean movie, where he ruins a painting, that's more or less how I reacted! Luckily, they weren't ruined, a little bit of gray paint, followed by a final layer of white drybrushing fixed it.


