Connect With Us

Crosscol

Posts tonen met het label 3D Printing. Alle posts tonen

zondag 27 februari 2022

Locke & Key chain key

I have made several props from the Locke & Key comics before, and here's another one! This one is a full scale replica of the Chain Key. In the comics, it's a 90 cm long key and opens the Great Lock, wich grants access to the catacombs below Keyhouse. In the Netflix series, it's a small key, and the Great Lock is a padlock that launches a chain and can be used to restrain someone.


3D model

I made this key with my 3D printer. Of course, it couldn't be printed in one piece, it's way too big for that, and besides, a chain isn't exactly easy to print on an FDM printer. I used a reference picture for getting the correct measurements, and then broke the key down into different parts for easy printing.

When making the 3D models, there was one thing I kept in mind: I wanted to avoid supports as much as possible. Supported areas always look ugly and require a lot of post processing to look good. For this model, however, I couldn't avoid it entirely, but as you'll see, the supported area won't even be visible.

The most important part, obviously, are the chain links. I couldn't print a full chain link, because then it would be impossible to link them together, so I cut it in half. On the inside of the rounded end, I made a cutout where the links can be glued together. This is the only area where support will be needed, and it won't be visible when the links are glued together. For additional strength, I made holes in the ends that will be connected, for inserting pegs.


On the small replica I made a while ago, these pegs were pieces of filament. Needless to say, it wasn't very strong! I had glued everything together, but the key was still quite fragile. I didn't have to ship it, the client picked it up in person, so this wasn't a real problem then. For this full size replica, the pegs are printed rectangular pegs, so it will be a lot stronger!

The ends of the key were pretty simple shapes, and easy to model. The only part that was a bit more challenging was the ring at the end. The final link of the chain needs to go through it, so there needed to be a hole for the link in it. I decided the easiest way to do this was cutting the ring in half, and then glue the parts together.

Printing and assembling

With everything modeled, it was time to start printing! It was quite a lot to print, <nr> parts in total! The total printing time, estimated by Prusaslicer, was about 100 hours, and it would use about 1 kilogram of filament. For material, I used ABS. It's easier to sand than PLA, and especially the links would need quite a bit of sanding. Another big advantage is that it can be solvent welded with PVC cement for plumbing. I used 3 perimeters, 150 micron layer height, and a 25% infill.

I printed two links (four link halves) and the two pegs to link them together in one print job. I don't usually fill up my entire build plate, if the print fails for some reason I won't have wasted as much material. Each link was sanded with 120 grit sandpaper to remove the layer lines a bit, and then the links were connected. Because of the square pegs, they automatically align correctly.


Same for the ends of the key, the parts were mostly printed one by one, sanded and then put together. Sanding is a lot easier before assembly, because it's easier to reach most spots.


And then finally, all links were connected to form a chain. At one end, the ring was glued on, and at the other end, the key bit and the ball were glued on. A bit more sanding was required to clean up the seams between the link halves, and where needed, a bit of spot putty was used.


Painting

Painting started with a coat of filler primer. I can't say I'm too happy with this stuff, though. It doesn't do a very good job filling up the layer lines. It sand quite well, though, but you need to apply a few coats, and sand in between them. In the future, I plan to try out a two component filler primer. Many people use this and report excellent results; the downside is that you need a spray gun to apply it. Since I still had a few rattle cans of filler primer, I used this stuff.
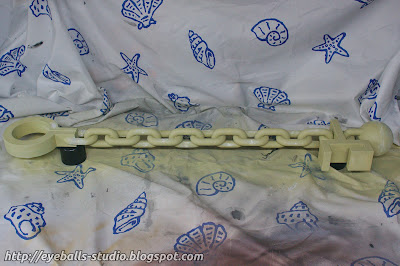
As you may notice on the pictures, I had already primed most of the parts before assembly, since it would be a lot easier to sand them. So, it basically went in this order: prime, sand, prime, sand again, assemble, fill seams, sand some more, another coat of primer, aaaaand more sanding. Oh, and in case you were wondering, yes, that's a shower curtain. When we moved out of our apartment, I kept it for this exact reason!

So, yeah, it required quite a bit of preparation. When I was satisfied with the surface, I applied a final coat of primer. This wasn't a filler primer, but a general purpose gray spray primer. The filler primer isn't suitable for painting directly, you need to apply another coat of regular primer. After the final inspection, it was time for the actual paint!


The client wanted a bronze finish, so I started with a brown basecoat. There were lots of hard to reach spots, and I had to use several passes to coat everything. It's always better to use more thin coats, to avoid drips. Luckily, the paint dried quite fast. Using a fan also helps to make the paint dry faster.


After the brown basecoat, I sprayed on a coat of bronze paint. It covered quite well, and afterwards I wasn't really sure if the brown basecoat was really necessary. Ah, well, nevermind! The key looked very shiny, new and metallic at this point. A bit too new and shiny if you asked me! So I brought in my favourite stuff to make things look a little less new and shiny: oil paint! I prefer water mixable oil paint, so I don't have to mess around with smelly paint thinners that might potentially damage other paint coats.


I used dark brown and grey to apply some dirt and grime, especially in the narrow spots where the links connect. The nice thing about these oil paints is that they dry very slowly (it can take a few days for them to fully dry) and you can play around with them a lot. Even when used sparingly, it makes a huge difference!


Finished!

After drying for a few more days, the key was finished and ready for shipping to the client. It was a really fun project, probably one of the biggest prints I have done so far. Here are some pictures of the finished project!


zondag 13 oktober 2019

Locke and Key sketchbook

Hey everyone! Yes, this blog is still alive! I've been neglecting it lately, but here's another build log! So, what did I make? I made a sketchbook based on the comic series "Locke and Key"!
This project is a custom comission. The client had a key from the comics, and asked me if I could make a book with some sort of holder for the key. He sent me a sketch of the design he had in mind, so I got to work.

The book is a combination of the kraft paper leather technique I use for most of my books and 3D printing. For this book, I also used wood.

The printed ornaments
This book has quite a bit of 3D printed ornaments. There are the corners, wich have the initials of the author and artists on them, and then there's the key holder. I modeled all of these in Fusion 360 and printed them in ABS-X on my Prusa I3.


For the key holder, I did some tests first. The idea was to make the key 'snap' into the holder, snugly enough to hold it in place, but still easy enough to take it out again. I made a few test pieces of the holder and, after I found the right measurements, I started printing. I used ABS-X for the ornaments because it's very easy to sand, and it warps less than regular ABS.


After all the ornaments were printed, I first repaired small defects with spot putty and then started sanding. Lots and lots of sanding! I started with 120 grit, to get rid of all the layer lines, and then worked my way up to 600.


On the corner ornaments, there is supposed to be a texture in the recessed parts near the corners. Rather than modeling it (my 3D modeling skills aren't exactly impressive), I filled them with sand and then added a few drops of watered down wood glue. Much easier than modeling the texture!
Next up, I sprayed everything with a filler primer. This gets rid of the last bits of layer lines and gives everything a nice smooth surface for painting.


The wooden frame
The wooden frame is made from 4mm thick, 30mm wide strips, with rounded corners. The corner ornaments are modeled so these strips fit into them. I didn't want the wood to look all new and fresh from the hardware store, of course. Here's a trick I used before to age wood. First, I dissolved a steel wool sponge in white vinegar. This takes a few days until it's completely dissolved. This mixture is then brushed onto the wood.


The wood will start turning darker brown immediately. I let it soak for a few minutes, and then rinsed the excess away. The reaction darkens the wood grain. After it had dried, I applied a pale oak varnish.

The fake leather
For the rest of the cover, I used my fake leather technique. Cardboard shapes were glued on the cover, for creating the embossing, and next wrinkled kraft paper was glued over it. Then, a black basecoat, dark brown applied with a sponge, a very thin coat of yellow ochre and finally a bronze drybrushing. To finish, a matte clearcoat.


After all the paint had dried, I lined the insides of the covers with felt. To protect the pages from the moisture while the glue dried, I put sheets of waxed paper between the cover and the pages. I put the book between clamps, and let it dry for a few days.
This is quite a crucial step, and one that shouldn't be rushed. With all the glue and paint on the covers, they will always warp a bit. The felt lining is the last thing that's glued on, so the book should be pressed as flat as possible while it dries. I always take my time for this, about five days. Even though the glue has dried after one day, there's still moisture in the covers, so if you remove the clamps too soon, it will warp again.

Final assembly
The only thing still left was putting everything together. For the wood, I used a general purpose hobby glue, and for the printed parts, I used super glue. Again, lots and lots of clamping while the glue dries. Even for super glue, I have found out the hard way it doesn't always cure as fast as you think. The only time it cures almost instantly is when you glue your fingers together!


donderdag 9 augustus 2018

My Prusa I3 MK3!

In March, I finally placed an order for a Prusa I3 MK3 3D printer. I had been planning to buy a 3D printer for a while. At first, I wanted to get one of those cheap I3 clones, but after reading a lot of user experiences I decided to spend the extra money and get an original Prusa I3. Bottom line is: the cheap clones are ok printers, but you have to spend a lot of time to get them to print more or less decently, and I didn't want to do that.

The waiting game
So, like I said, somewhere early March I placed the order, and the estimated shipping date was mid-April. That gave me plenty of time to study the assembly manual and read user feedback. I found out some people had some trouble getting the frame all straight and perpendicular, but luckily this wasn't a problem that couldn't be fixed.
In the meantime, the shipping date moved forward a few times. The flu season hadn't spared the people at Prusa Research, and late April I finally got a shipping notification. Woo hoo!

The build process
I have documented my entire build in a series of YouTube videos. The entire assembly manual has nine chapters, so I made it a nine part video series. Also, this is the first time I'm actually talking in front of the camera, something I haven't done before (my other videos in wich I talk are all voice-overs). I'm not exactly the best public speaker, but I think I did a decent job without sounding too much like a blabbering idiot.


The entire build went pretty smooth. The mentioned problem with the frame geometry didn't happen to me. One this that worried me a little bit at first were the linear bearings on the Y-axis. During assembly, they were quite noisy, and I was worries I had over tightened the screws to hold them in place. Nothing that was beyond fixing, but if I indeed damaged them it would mean ordering new bearings and waiting some more. Luckily, during printing the noise is gone. I managed to damage one part, though. When I tried to snap the spool holder in place, the bottom part that snaps around the aluminium frame broke, and it doesn't properly stay in place. Not a big issue, since I'm also building an enclosure with a separate spool holder anyway.

My experience so far
I've had the printer for a few months now. I've printed quite a bit, and here's what I've encountered so far.
First of all, 3D printing isn't plug and play. Sorry, it isn't. It often requires some experimenting and trial and error to get things right. I've already experienced a few jams that required me to disassemble the entire extruder, and I'm glad I bought the kit and not a preassembled printer.
I have also built and enclosure out of Ikea Lack tables, so I can print with ABS and HIPS. There are a few problems with this. First of all, Ikea Lack tables are very unstable; especially when printing small parts, where the extruder has to move back and forth rapidly, the entire enclosure shakes a lot. I managed to get this more or less under control my attaching some steel corner braces. Second, the printers jams easily inside an enclosure with the doors closed. Apparently, this has to do with the design of the extruder, it has insufficient cooling, wich causes something known as heat creep. I'm not gonna go into too much detail, but it's a bad thing.
Prusa has designed a new extruder body with improved cooling, so that's on my to do list: printing the new parts, and then rebuilding the extruder. Again, glad I bought the kit, because I basically have to take the entire extruder apart and reassemble it with the new parts.
Overall, I'm quite satisfied with the printer. I've had a few problems, but this also happens on printers that cost three, four times as much.