Connect With Us

Crosscol

Posts tonen met het label Props. Alle posts tonen

zondag 27 februari 2022

Locke & Key chain key

I have made several props from the Locke & Key comics before, and here's another one! This one is a full scale replica of the Chain Key. In the comics, it's a 90 cm long key and opens the Great Lock, wich grants access to the catacombs below Keyhouse. In the Netflix series, it's a small key, and the Great Lock is a padlock that launches a chain and can be used to restrain someone.


3D model

I made this key with my 3D printer. Of course, it couldn't be printed in one piece, it's way too big for that, and besides, a chain isn't exactly easy to print on an FDM printer. I used a reference picture for getting the correct measurements, and then broke the key down into different parts for easy printing.

When making the 3D models, there was one thing I kept in mind: I wanted to avoid supports as much as possible. Supported areas always look ugly and require a lot of post processing to look good. For this model, however, I couldn't avoid it entirely, but as you'll see, the supported area won't even be visible.

The most important part, obviously, are the chain links. I couldn't print a full chain link, because then it would be impossible to link them together, so I cut it in half. On the inside of the rounded end, I made a cutout where the links can be glued together. This is the only area where support will be needed, and it won't be visible when the links are glued together. For additional strength, I made holes in the ends that will be connected, for inserting pegs.


On the small replica I made a while ago, these pegs were pieces of filament. Needless to say, it wasn't very strong! I had glued everything together, but the key was still quite fragile. I didn't have to ship it, the client picked it up in person, so this wasn't a real problem then. For this full size replica, the pegs are printed rectangular pegs, so it will be a lot stronger!

The ends of the key were pretty simple shapes, and easy to model. The only part that was a bit more challenging was the ring at the end. The final link of the chain needs to go through it, so there needed to be a hole for the link in it. I decided the easiest way to do this was cutting the ring in half, and then glue the parts together.

Printing and assembling

With everything modeled, it was time to start printing! It was quite a lot to print, <nr> parts in total! The total printing time, estimated by Prusaslicer, was about 100 hours, and it would use about 1 kilogram of filament. For material, I used ABS. It's easier to sand than PLA, and especially the links would need quite a bit of sanding. Another big advantage is that it can be solvent welded with PVC cement for plumbing. I used 3 perimeters, 150 micron layer height, and a 25% infill.

I printed two links (four link halves) and the two pegs to link them together in one print job. I don't usually fill up my entire build plate, if the print fails for some reason I won't have wasted as much material. Each link was sanded with 120 grit sandpaper to remove the layer lines a bit, and then the links were connected. Because of the square pegs, they automatically align correctly.


Same for the ends of the key, the parts were mostly printed one by one, sanded and then put together. Sanding is a lot easier before assembly, because it's easier to reach most spots.


And then finally, all links were connected to form a chain. At one end, the ring was glued on, and at the other end, the key bit and the ball were glued on. A bit more sanding was required to clean up the seams between the link halves, and where needed, a bit of spot putty was used.


Painting

Painting started with a coat of filler primer. I can't say I'm too happy with this stuff, though. It doesn't do a very good job filling up the layer lines. It sand quite well, though, but you need to apply a few coats, and sand in between them. In the future, I plan to try out a two component filler primer. Many people use this and report excellent results; the downside is that you need a spray gun to apply it. Since I still had a few rattle cans of filler primer, I used this stuff.
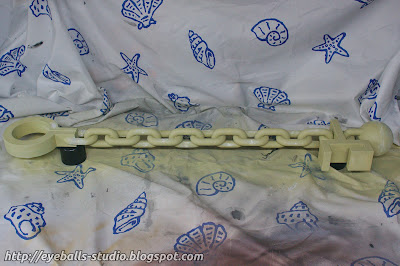
As you may notice on the pictures, I had already primed most of the parts before assembly, since it would be a lot easier to sand them. So, it basically went in this order: prime, sand, prime, sand again, assemble, fill seams, sand some more, another coat of primer, aaaaand more sanding. Oh, and in case you were wondering, yes, that's a shower curtain. When we moved out of our apartment, I kept it for this exact reason!

So, yeah, it required quite a bit of preparation. When I was satisfied with the surface, I applied a final coat of primer. This wasn't a filler primer, but a general purpose gray spray primer. The filler primer isn't suitable for painting directly, you need to apply another coat of regular primer. After the final inspection, it was time for the actual paint!


The client wanted a bronze finish, so I started with a brown basecoat. There were lots of hard to reach spots, and I had to use several passes to coat everything. It's always better to use more thin coats, to avoid drips. Luckily, the paint dried quite fast. Using a fan also helps to make the paint dry faster.


After the brown basecoat, I sprayed on a coat of bronze paint. It covered quite well, and afterwards I wasn't really sure if the brown basecoat was really necessary. Ah, well, nevermind! The key looked very shiny, new and metallic at this point. A bit too new and shiny if you asked me! So I brought in my favourite stuff to make things look a little less new and shiny: oil paint! I prefer water mixable oil paint, so I don't have to mess around with smelly paint thinners that might potentially damage other paint coats.


I used dark brown and grey to apply some dirt and grime, especially in the narrow spots where the links connect. The nice thing about these oil paints is that they dry very slowly (it can take a few days for them to fully dry) and you can play around with them a lot. Even when used sparingly, it makes a huge difference!


Finished!

After drying for a few more days, the key was finished and ready for shipping to the client. It was a really fun project, probably one of the biggest prints I have done so far. Here are some pictures of the finished project!


dinsdag 25 september 2018

Hocus Pocus book

This was by far my most ambitious project so far! A while ago, my wife asked me if I could make a replica of the spellbook from the movie "Hocus Pocus". If you haven't seen this movie, I definitely recommend it. Even though it's a family-friendly Halloween movie, it's not childish.
Anyway, I knew this would be a bit more challenging than the books I made so far (especially the ornaments), but nothing that couldn't be done. So let's get started!


I also documented the entire build process on video. Many hours of footage, many hours of editing, and I managed to process it into a 20-minute video! In case you're wondering, I recorded it using a Canon Legria HFR506 camcorder, edited the video in Lightworks and recorded the voice-over with a USB microphone and Audacity.


Materials

  • Sewn kraft paper sketchbook
  • 3 mm thick MDF
  • Cardboard
  • Air drying clay
  • Apoxie sculpt
  • 25 mm glass dome
  • Kraft paper
  • Unbleached hemp string
  • PVC foam plate
  • Super glue
  • Book binding glue
  • Epoxie glue
  • Hot glue gun
  • Thick needle
  • Molding silicone
  • Polyurethane resin
  • Foamcore board (for the mold)
  • Spray primer
  • Acrylic paints
  • Acrylic varnish
  • 8 mm neodymium magnets
  • Red felt
  • Gauze

The ornaments
Like I said, the ornaments would be quite a challenge. There are the four coiled-up snakes at the corners, the two snakes near the spine, the clasp on the front and a hand on the back. The hand isn't shown in detail anywhere in the movie, so I would have to improvise a bit.
I decided to make one of each ornament, and then mold them in silicone so I could cast multiple copies of them. I used a combination of PVC foam sheet and Apoxie clay, and took my time until I was satisfied with the sculpts.


Then, disaster almost struck. I made a silicone mold, and expected the silicone to be cured the next day. However, when I checked, the silicone was still a semi-liquid, sticky mess! I waited a few more days, but it simply didn't cure any further. What had happened? I suspect the catalyst for the silicone had expired. When I checked the bottle, I noticed some crystals on the bottom. I decided to wait a bit longer, but to no result.
So I ordered some new silicone and catalyst and started over. I removed the semi-cured silicone, and to get rid of any remaining liquid stuff, I brushed some catalyst over it and let it cure, so I could remove it easily. I made a new mold, and this time it worked fine. The next day, the silicone had cured as expected and I could start casting.


I used polyurethane resin for the ornaments. Four coiled-up snakes for the corners, two snakes for the spine, one clasp and one hand. When the resin had cured, I first cleaned the casts thoroughly and then sprayed them with a primer, followed by a dark gray acrylic basecoat. After the basecoat had dried, I applied a black wash, silver drybrushing and finally a satin clearcoat.


One ornament that required a special treatment was the clasp. To make it lock, I installed some neodymium magnets in it. Before painting, I carefully drilled some holes in the back, and glued the magnets in place with super glue. Magnets will be embedded in the book cover as well.

The book
My wife wanted a book with brown pages. This wasn't easy to find! There's plenty of sketchbooks made from brown kraft paper, but they are always either spiral bound or very thin. It took me some searching, but finally I found one on Ebay!
When the book arrived, I noticed the spine wasn't glued. The pages were stitched together, but no glue. To make sure the book would be strong enough, I applied a coat of book binding glue to the spine, followed by a strip of gauze, followed by another coat of glue.
One last thing needed to be done, and that was some sort of headband. I have tried making them myself in the past, but it didn't look too good. A great alternative was a strip of red felt, glued to the spine.
I didn't take any pictures of this, but it is shown in the Youtube video.

The cover
The book cover is made from 3mm thick MDF, and cardboard for the spine. The spine needed to be rounded a bit. I did this by glueing a few layers of thin cardboard together on a piece of PVC pipe, and letting it dry for a few days.
Another prominent feature of the book are the stitches, and the eye. The eye is a stock photo of an eye, printed on photo paper, and glued to a glass dome. The eyelids and stitches were sculpted directly on the cover.


I sculpted the stitches out of air drying clay. For the eyelids, I used Apoxie sculpt. After the clay had dried, I carefully drilled out the holes in the stitches with a 2 mm drill bit, and cleaned them up from the back of the cover.
I didn't take pictures of it (again), but there are six small magnets around the eye. I drilled 8 mm holes in the cover, and put the magnets in them, sandwiched between two sheet of paper on the front and back. These line up with the magnets I put in the clasp, so they keep it in place.
After glueing both cover boards and spine together, I used my wrinkled kraft paper technique for creating a faux leather effect. Usually, I try to use one single sheet of paper for the entire cover, but in this case it was easier to cut it into several pieces. The reason I try to use a single sheet is so you don't see the seams between the sheets. If this case, however, I could hide the seams in the stitches so they wouldn't be visible anyway.
And then it was time for the paint job! As usual, I started with a black basecoat, followed by a layer of brown. I used a mixture of burnt umber with a bit of pyrrole red to get a chocolate-like brown. After it had dried, I rubbed a very thin coat of yellow ochre over it, followed by a bronze drybrushing.
The final metallic drybrushing makes a huge difference! I have tried several colors (copper, bronze, gold, silver, ...) but bronze and copper look the best. I have also experimented with different color combinations the last few months, but that's something for a future post.


Before the final clearcoat, I sewed the stitches. First, I opened up all the holes with a thick needle, and then I sewed them using unbleached hemp string. It wasn't easy, sewing relatively thick, rough thread through small holes, but the result looks pretty nice. I glued the stitches in place from the back with a hot glue gun, and then trimmed everything with a sharp knife.
Next, I sprayed the cover with matte acrylic varnish. In the past, I have used satin varnish, but I think matte looks a lot better.


Putting it all together
And now it's time for the final assembly! I first glued the cover to the book. I needed to take special care to make sure everything was lined up properly, because otherwise the book wouldn't open afterwards. I glued on one side at a time, and pressed everything in place firmly, making sure there weren't any air bubbles. I put the book between clamps to keep everything together as the glue dried.


Next, I put the ornaments in place with epoxy glue, one side at a time and waiting until the glue was fully cured before switching to the other side (about 1 hour).


And then finally, the clasp! I glued a strip of leather between the clasp and hand, glued some felt to the inside of the strap and the clasp (not the hand), and finally glued the hand to the back cover.


And here's the final result! It took me a lot of work, but I think it turned out very nice. My wife is very happy with the result.


donderdag 9 augustus 2018

Oogie Boogie dice

This is going to be a short and simple one. With this prop, I introduced my wife to foamsmithing. She was working on an Oogie Boogie costume, from Tim Burton's "The nightmare before Christmas", and wanted a pair of dice to go with it. In the movie, Oogie Boogie rolls dice with skulls on the faces. A perfect beginner project!


Materials
  • 10mm EVA foam floor mats
  • 2mm EVA foam sheets
  • Contact cement
  • Book binding glue
  • Acrylic paints
  • Satin varnish
  • Hobby knife
  • Band saw
  • Dremel with sanding drum, grinding bits and cutting wheel
Making a cube
To make a cube, you could just stack together sheets of foam until you get the right thickness, but that would require a lot of foam, and if you're using floor mats with a texture, you'd need to sand it away. I didn't want to do that. Instead, I cut six squares for each cube (I made two) and bevelled the edges at 45°. This is done easily with a band saw; if you don't have a band saw, it could also be done with a bench sander or, but that's a bit trickier to get it right, a Dremel.
The squares were then glue together with contact cement. No need to sand away any texture, and a perfect cube!


The faces
This is where my wife stepped in. She had downloaded a template for the faces and traced them all on 2 mm thick foam sheets. Next, she cut them all out and glued them on the cubes.


The next was done by me again (she doesn't like to use power tools). With a grinding bit on my Dremel, I cut out the eyes and smoothed the edges and corners a bit. I also added some scratches and cuts with a cutting wheel. Of course, I forgot to take a photo of that, but you can see it in the next step.


Painting
This was, again, done by my wife. First, the dice were primed with book binding glue, and then got a dark red base coat. After it had dried, the eyes and scratches were painted black. Finally, the entire prop got a coat of sating varnish.


And here's us, with our costumes and the dice, of course, at Elf Fantasy Fair Haarzuilens.